WRIGHT
BROTHERS Aeroplane
Company
![]()
![]()
![]()
![]()
We�ve divided the workshop into five simple sections:
To help you lead this workshop, I�ve written out the information and organized it in a binder (included with the workshop kit). The information is in the order in which I would suggest presenting it, and it's written out as a narrative. I certainly don�t expect you just to read this to the participants - I don�t want to interfere with your own natural teaching style and the rapport you have with your students or charges. I�ve just set the basics down in big type so you can easily pick out the important information, phrase it in your own words, and add your own ideas and experience to it. The workshop kit also contains some visual aids to help you convey the information. The video you'll find was taken of me presenting the information to an imaginary workshop group. You have several choices as to how you might use this video:
Additionally, the kit contains over two dozen photos and drawings keyed to information in the binder and the video. I�ve made these photos large enough so you won�t need an overhead projector or any other electronic visual aid. Just show the participants the illustrations. The information that goes along with each photo or drawing is in the binder and pasted on the back of the illustration so you don�t have your head buried in the binder while you�re waving the illustrations at the kids. I�ve keyed the information in the booklet to 31 visual aids. Most (but not all) of these aids are photos or drawings. A few are keyed to other materials in the kit. For example, when you�re explaining how to make a practice rib, the visual aid is the template, the materials, and the sample practice rib included in the kit. I�ve a couple more suggestions, then I�ll let you get on with the workshop info:
I�ve tried to make the workshop simple and straightforward to make your task as easy as possible. But I can�t envision what�s going to happen out there in the field. You may have expertise to contribute that I don�t know about or the kids may take you in a direction neither of us ever imagined. When the unplanned happens, explore a little. Have some fun doing it. And let me know if you find anything worthwhile that other workshop leaders should know about. With all good wishes, |
|
| This is the workshop narrative that comes with the Centennial Flyer Workshop kit: | Click on a photo or drawing to enlarge it. |
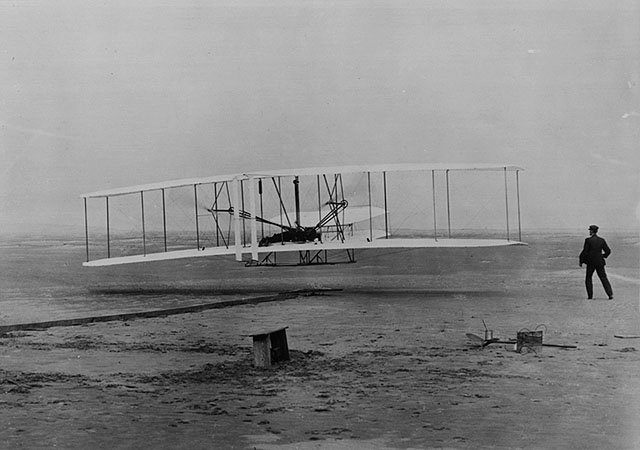
1On December 17, 1903 - nearly one hundred years ago - Wilbur and Orville Wright made the first sustained, controlled, powered flight in an airplane. This airplane, which they simply called the Flyer, made only four flights that day, the longest of which lasted 59 seconds and covered 852 feet. Today it hangs in the Smithsonian Air and Space Museum in Washington, DC. With your help, we are going to build an exact copy of this famous airplane to be permanently displayed in Dayton, Ohio, the home of the Wright brothers. It will hang in the Dayton International Airport where over 4 million people will see it each year. They will also know that young people like you from all over America and other parts of the world helped build this airplane. Your name will be permanently enshrined in this display. |
 |
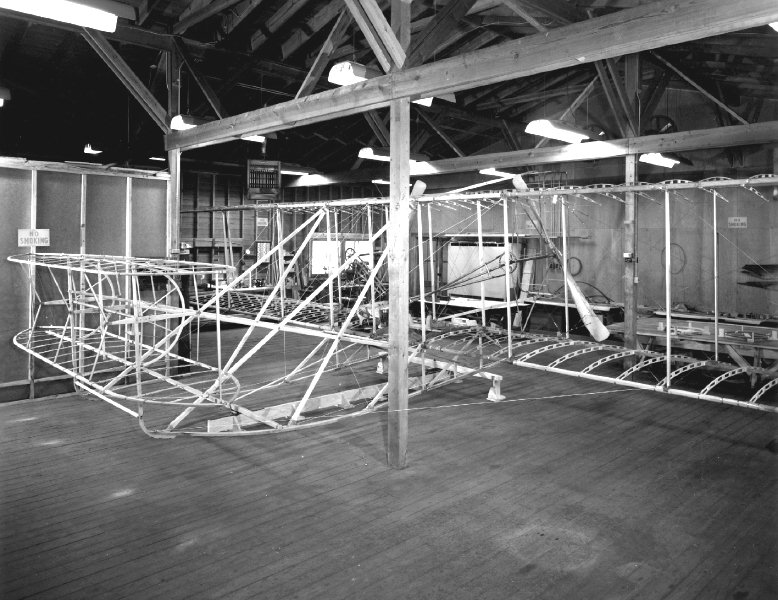
2To build the original Flyer, Wilbur and Orville first built a wooden frame, making the straight parts from spruce and the curved parts from ash. Then they stretched cloth over the frame, covering the wings. The completed Flyer stretched 40 feet from wingtip to wingtip. The most important part of any airplane is the wing, and the most important part of the wing is the rib - this is what holds the shape of the wing and produces the lift the airplane needs to fly. This is what you will be building. There are 74 ribs in the frame of the Flyer, all working together to make it fly. Each of you will build a 1/3 scale rib for practice, then you�ll team up to build a full-size rib. You can take the small ribs home with you. You�ll sign your names to the large rib and send it to Dayton where it will be assembled in a full-size Flyer. The completed airplane will have your signature somewhere in its wings. |
 |
3Notice that the ribs are curved. This curve, which is called a camber, is very, very important. This is what makes it possible for the wing to fly. In flight, air streams past the top and bottom surfaces of the wing. The faster an air stream moves, the lower the air pressure inside that air stream. Try this experiment. Tear a strip of paper about an inch wide and as long as a sheet of paper. Hold it up to your lips and blow over the top of the paper. The paper rises! The pressure in the fast-moving stream above the paper is less than the pressure below it, and the pressure from below lifts the paper up. This is how a wing generates lift and why the curve is so important. The air molecules flowing over the top of the wing have to travel faster than those flowing underneath. The pressure below the wing is greater than the pressure above it. This lifts the wing up and makes it fly. |
|
4You are going to build a rib to the exact same curve or camber as the Wright brothers used in their Flyer. You�re also going to use the same materials - ash for the curved cap strips that form the top and bottom surfaces of the rib, and spruce for the spacer blocks that hold the cap strips apart. You�ll be assembling these ribs that same way the Wrights did, using a template. By building each rib on the same template, Wilbur and Orville made sure all the ribs were cambered exactly the same. The curve of the assembled wings was precisely the same all along their length and each part of the wing produced the same amount of lift. The templates you�ll be using today have to go back to Dayton, but each of you will get a printed drawing of the rib and instructions for making your own template so you can make more ribs, if you want. |
|
5The ribs of the Wright Flyer are made in two parts. Orville and Wilbur made one part to fit between the front and back spars. (The spars are long beams that run the length of the wings.) The other part fits behind the rear spar. The two parts are joined with strips of metal that run above and below the rear spar. You can see these metal strips in the drawing on the large template. When you make the full size rib, you�ll make it exactly as Wilbur and Orville made it, in two parts. But you�ll make the small practice rib in one long piece for simplicity. To make the practice rib, you need a template, two strip of ash for cap strips, a few piece of spruce to make the blocks, some toothpicks, and a dab of glue. Before you cut or glue up any wood, you�ve got to understand an important property of wood. Every piece of wood has wood grain that runs in one direction through the piece. If you look closely at the wood, you can see little lines in the surface - this is the grain. To make the rib as strong as possible, you must make sure that the wood grain in the cap strips and spacer blocks run in the same direction. This is very important! If the wood grain in the blocks runs in the different direction than the cap strips, the rib will be weak and may come apart in flight. The wood grain in the cap strip and the blocks should run from the leading end (front) to the trailing (back) end - through the length of the rib. Use the "Block Gauge" on the template to cut the spruce blocks to size. Notice that there are three different widths of block stock - one for block #1, one for blocks #2 through #8, and one for blocks #9 through #11. Be sure to get the right width for each block. The spruce is soft enough to cut with a razor blade, but you must rock the blade back and forth to get a straight cut. If you simply press the blade down, the wood will split at an angle. When you have made all the blocks, insert the pointed ends of the toothpicks in the holes in the template. (The toothpicks will poke down below the template, so you�ll have to rest it on some scraps to hold the template slightly above the worktable.) These toothpicks become clamping posts on the template that align the parts and help to assemble the curved rib. Place the cap strips between the posts on the template. Position each block between the cap strips. It helps to use a toothpick to spread the cap strips while you do this. Use more toothpicks as wedges to clamp the cap strips and the block together, sliding the wedges between the posts and the cap strips at both the top and bottom of the rib. At the trailing (back) end of the rib, clamp the cap strips together. Don�t worry that the cap strips are too long. You will cut them to the proper length after you glue up the rib. Once all the strips and blocks are clamped together, you�re ready to apply some glue. Remove one set of wedges at a time, remove the block, apply a drop of glue to the top and bottom edges, replace the block between the cap strips, and put the wedges back in place. Make sure that the block and the strips are aligned with the drawing on the template. When you come to the trailing end of the rib, put a drop of glue between the cap strips and clamp them together. You�ll find it helps to use a toothpick to apply the glue. Let the glue dry. This special type of glue, called wood molding glue, was donated by the Franklin Glue Company just for this project. It hardens very quickly - the small ribs will be ready to remove from the templates long before you�re ready to go home. After the glue is dry and you remove all the toothpicks you�ve used for posts and wedges, you�ll mark the length of the cap strips on the template, then remove the rib from the template and cut the strips to the right length with a small saw. Let�s get to work on the practice ribs. While you�re working, I�m going to tell you the real story of the Wright brothers and what they really invented. Most people think they invented the airplane, but this isn�t true. There were airplanes around long before Wilbur and Orville Wright were born, but they didn�t work very well. What the Wright brothers discovered was the secret that made it possible to control airplanes in flight. |
|
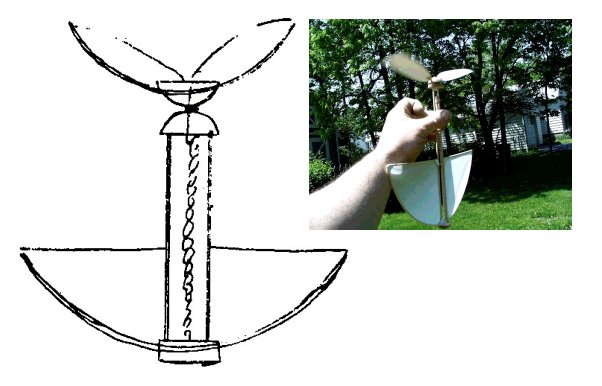
6Wilbur and Orville Wright became fascinated with flying when they were kids. Wilbur was 12 years old and Orville was 8 when their father brought them a rubber band-powered helicopter. It may not look that exciting to you today, but when Wil and Orv were young, rubber band motors had just been invented and these helicopters were super hot. Wilbur and Orville played with this toy until they wore it out. Then they began to build their own copies of it. This is actually the first powered aircraft they ever made! In later years, when asked what sparked their interest in aviation, they would recall this toy helicopter. |
 |
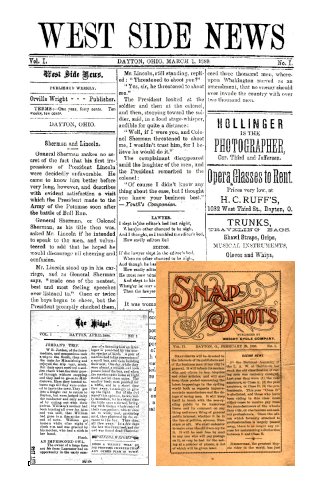
7Although they were interested in flying from the time they were young, the Wright brothers didn�t start out to build an airplane. As young men, they struck out to be printers. Orville�s hobby was printing, and this gradually grew into a career. By the time he was 16, he had his own printing business. When he began printing a weekly newspaper, The West Side News, for his neighborhood, Wilbur joined him as a reporter and editor. The Wrights did not do well in the newspaper business and they resorted to "job printing" - printing handbills, letterheads, brochures, and posters for other people. They also began to build printing presses. They built two for themselves and several for other printers. Their unique press designs earned them a reputation as talented mechanics. |
 |
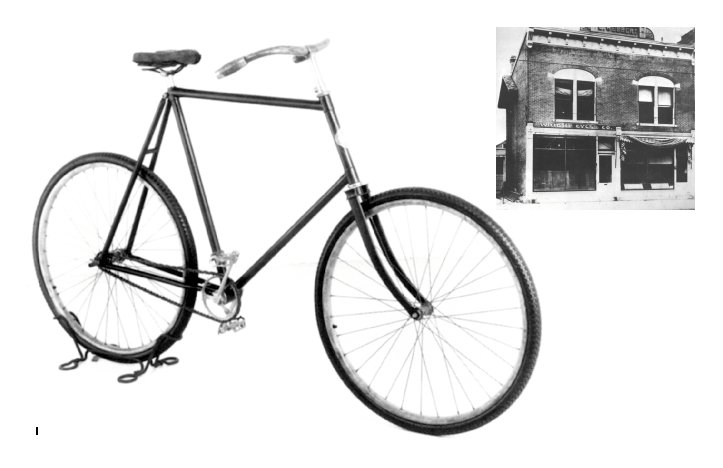
8In the late nineteenth century, the favorite way to get around a city was on bicycle. Wilbur and Orville bought their first bicycles in 1892. Because they had a reputation as good mechanics, their friends began to bring them their bicycles when they were in need of repair. Soon, they had a full-time bicycle repair business. They let another brother, Lorin Wright, take over their old printing business. In 1895, they began to manufacture their own bicycles out of a shop in Dayton, Ohio. They made two models - the Wright Van Cleve which they custom-built with the best materials and the lower-priced St. Clair. (Both bikes were named after Dayton area pioneers.) The bicycle business was very profitable for the Wrights and they began to put a little money away to pursue other interests. |
 |
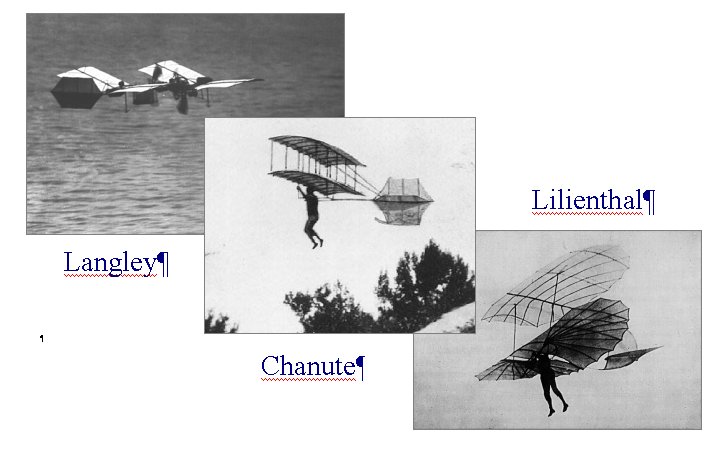
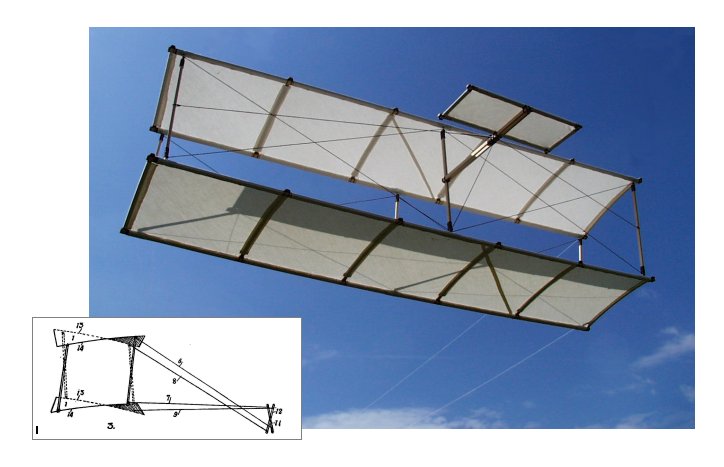
9In 1896, three things happened that reawakened Wil and Orv�s interest in flying. Samuel Langely, the director of the Smithsonian Institution, flew an unmanned powered airplane for several miles. It only had a wingspan of 10 feet, but it was the largest and most successful airplane that anyone had flown to date. It got people thinking that maybe an airplane could be built large enough to take a man aloft. Just south of Chicago, Octave Chanute and a band of young aeronautical scientists flew a hang glider with two wings - a biplane - for the first time. Some of their flights stretched over 300 feet, an astounding accomplishment for the day. And in Germany, Otto Lilienthal died in a gliding accident. Lilienthal was the world�s first successful hang glider pilot and he was a famous in 1896 as any NASCAR driver is today. When he died, all the world mourned - the Wrights included. |
 |
10It was Otto Lilienthal�s death that got the Wrights thinking about building their own airplane. Lilienthal�s hang glider was control by weight shifting - Lilienthal would throw his body this way and that to make the glider go where he wanted it to go. It was a poor control system and the Wrights suspected that it caused his death. He had gotten into trouble and lost control of his glider. They began to think up better and safer ways to control an airplane. They studied birds to see how they controlled themselves in flight and noticed birds twisted the tips of their wings to roll right and left. In 1899, Wilbur invented a way to twist the wings of a biplane by using a few simple cables. He built a model glider that he could control with strings from the ground and flew it as a kite. It worked - he could roll it right and left. He and Orville began to plan their first manned glider. |
 |
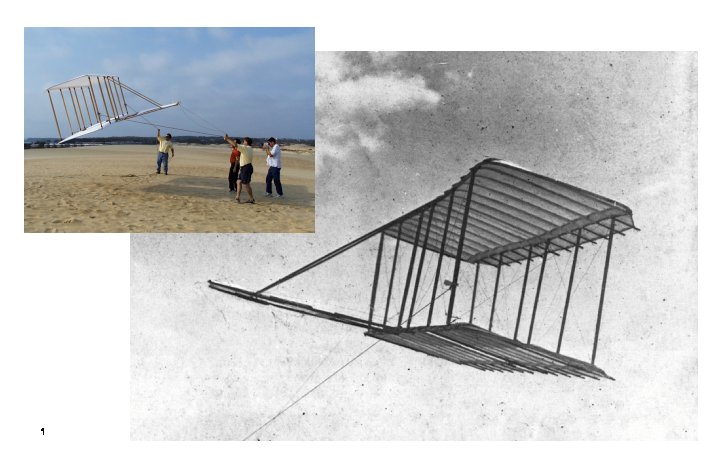
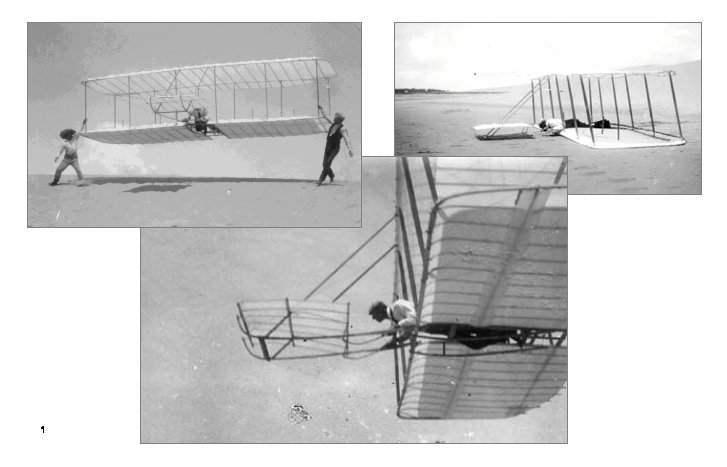
11In 1900, the Wright brothers built a small glider with "wing warping" to roll the glider right and left and an elevator in front to pitch the glider up and down. Rather than fly it in Dayton, Ohio where the winds were uncertain and the ground was hard, they decided to take their glider to a windy place with soft sand to cushion their fall if they should crash. They decided to go to Kitty Hawk, North Carolina where the wind blows constantly over miles and miles of sandy beaches. The control system on their first glider worked well enough, but the aircraft did not produce enough lift to support a grown man in flight unless the wind was blowing very hard. Wilbur and Orville made only a few manned flights, then decided that they needed a bigger glider with more wing surface. |
 |
12In 1901, the Wrights came back to Kitty Hawk with a glider that had longer, fatter wings. It produced a little more lift than their first glider, but it still did not have as much lift as they needed to fly safely. What was even more disappointing was that the new glider was less controllable than the first. After just a few weeks of flying, Wilbur lost control in the air, crashed the glider, and cut his scalp badly. When Orville came running up to see if Wilbur was alright, Wil declared that he still believed man would someday fly, but probably not for a thousand years. |
 |
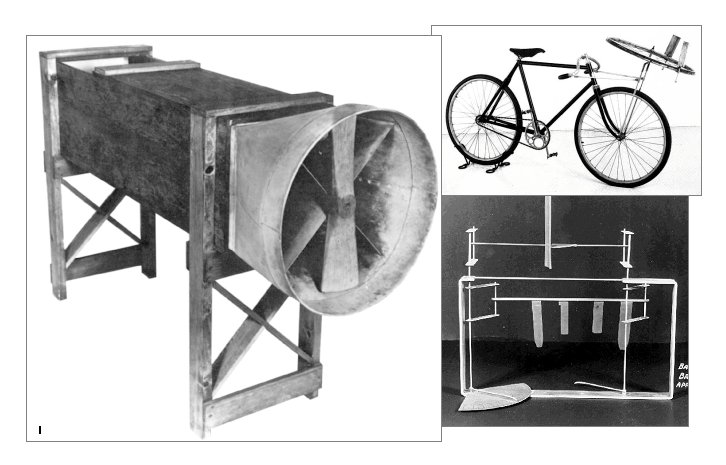
13Back in Dayton, Ohio, the Wright brothers took a careful look at what they had accomplished so far. They had been using information from other scientists to design the wings of their gliders, and these gliders had not flown properly. They decided to check this design information by running their own experiments. They used one of their bicycles for the first experiment. They mounted a wheel out in front of the bike and fastened miniature wings to the wheel. By riding very fast so the wind blew over the miniature wings, they could make rough measurements of lift. These bicycle experiments proved the design information was wrong. Next they built a wind tunnel and some very precise instruments to measure lift and other properties of wings. They studied over 200 different wing shapes so they could choose the best shape for their next glider. |
 |
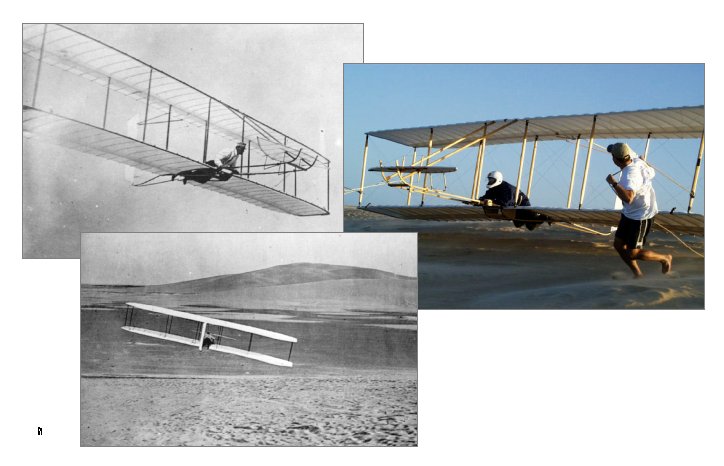
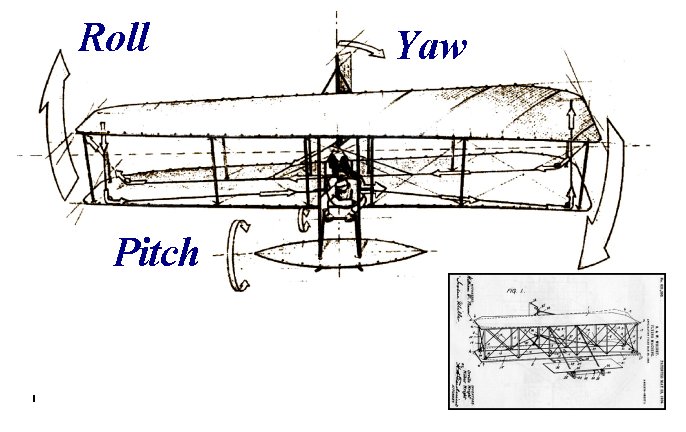
14In 1902, the Wrights returned to Kitty Hawk with a 32-foot glider, they largest gliding machine anyone had ever tried to fly. Like their previous gliders, it had warping wings for roll control and an elevator for pitch control. And for the first time, their glider had a tail with a movable rudder that would yaw the glider left and right. The Wright brothers reasoned that since an aircraft had to fly in 3 dimensions, it need three separate controls for roll, pitch, and yaw. And they were right. The 1902 Wright Glider flew like a dream. For the first time they were able to make record-breaking gliding flights, staying in the air for over a minute and traveling over 600 feet. What�s more, they had good control in flight, turning left and right at will. After nearly 1000 flights, they decided to try powered flight. |
 |
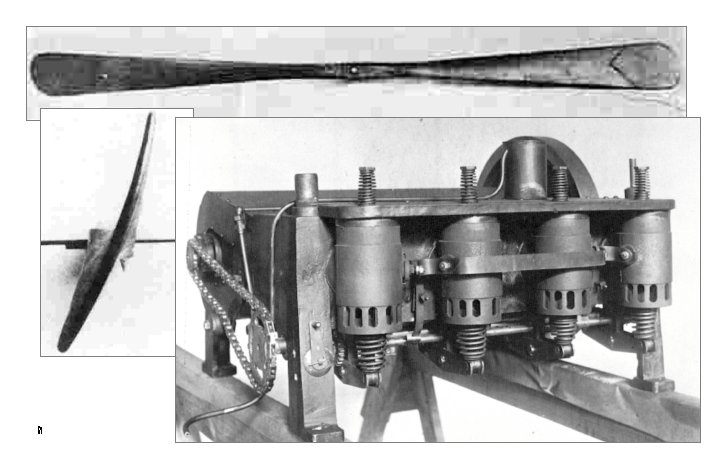
15Back home in Dayton, they discovered there were no motors light enough and powerful enough to drive their airplane. Additionally, no one had ever built an efficient "air screw" or propeller that could produce the thrust needed to propel the airplane into the air. So the Wrights did what they had always done - they built their own. With the help of a talented mechanic, Charlie Taylor, they built a 12 horsepower, 200-pound engine for their airplane. On their own, they developed a completely new theory about propeller design. They saw propellers as slim wings that revolved around an axis. Like any wing, the propeller blades needed to be curved to develop the maximum amount of thrust. Using this theory, they built the first set of modern propellers. |
 |
16The Wrights understood that the success of their airplane depended not just on its design, but their skill as pilots. When they got back to Kitty Hawk, they spent calm or rainy days putting together their powered airplane, the Flyer. But when the sun was out and the winds were up, they dragged out their 1902 glider and practiced flying. From September to November of 1903, they made another 1000 flights in this glider, making them the most experienced pilots in the world. |
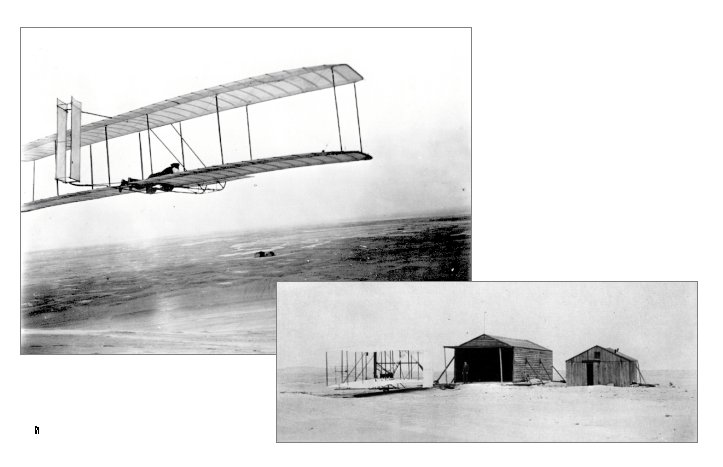 |
17All during the fall of 1903, they had one small problem after another getting their Flyer ready to fly. At first, the propellers kept spinning off the shafts, so they glued them in place. Then the propellers shafts cracked and they had to send back to Dayton for new ones - not once, but twice. Finally, on December 17, 1903, they were ready to fly. The wind was blowing harder than they would have liked, but they decided to chance it. Six members of the Kitty Hawk Lifesaving Station helped them roll their plane out of its hangar and point it into the wind. The first flight was successful, but short - Orville traveled just 120 feet in 12 seconds. The second and third flights were a little better - 200 and 225 feet long. The fourth flight proved they could really fly. Wilbur stayed in the air almost a full minute - 59 seconds - and traveled 852 feet. |
 |
18Back home, Orville and Wilbur realized they still had a lot of work to do. Although the Flyer would fly, it was not a practical flying machine. It could only be launched in strong winds and the four short flights they had made showed it was hard to control. Moreover, they had only flown in a straight line - they hadn�t attempted any turns. They built another airplane, the Flyer 2, and began to experiment with it in a field outside of Dayton called Huffman Prairie. At first, they had a hard time launching it without the strong winds of Kitty Hawk, so they built a catapult to help sling the airplane into the air. They made their very first turns in the airplane, but they still found it difficult to control. Often, they would lose control in a turn and have to land immediately. |
 |
19In the summer of 1905, Orville had a serious crash that badly damaged the Flyer 2. He escaped with only minor injuries, but the brothers both realized that he could have been killed. Rather than rebuild the airplane, they decided to design and build a new one. They reviewed all the things they had learned about flight over seven years and incorporated all the changes and improvements they could think of. They began to fly the Wright Flyer 3 in July of 1905 and quickly discovered it was a vast improvement on their previous Flyers. It responded well to its controls and could be kept flying indefinitely, as long as the fuel lasted. The Wright began to make flights that were measured in miles rather than feet. The Flyer 3 could be launched in a variety of weather conditions, fly to a given location, and "land without crashing," as Wilbur put it pointedly. In short, it was the world�s first practical airplane. |
 |
20The Wright brothers never claimed to have invented the airplane. Instead, they wished to be remembered for making "the first sustained, controlled powered flight." The key word in that claim is "controlled." While the Wright brothers made many discoveries and improvements during the seven long years they worked to developed a practical flying machine, their most important accomplishment was the three-axis control system - roll, pitch, and yaw. This was the basis for the Wright patent, the "grand-father" patent of the airplane. We have developed more powerful engines and faster, larger airplanes over the years, but we have never come up with a better control system. Everything that flies - including helicopters and spaceships - has roll, pitch, and yaw controls. This is why it�s said that before the Wright brothers, no one in aviation did anything right. And since the Wright brothers, no one has done anything different. |
 |
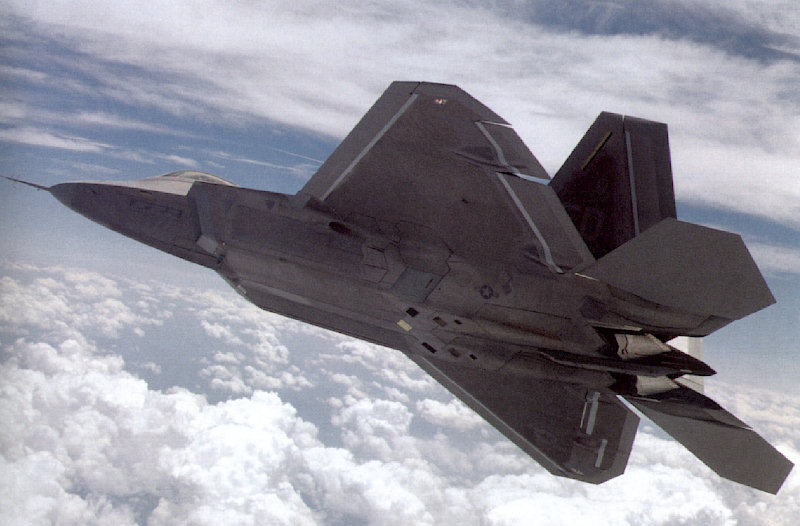
21The year 2003 is the one-hundredth anniversary of the Wright�s first powered flight, and you�ll probably hear a great deal about how the airplane has developed since 1903.We�ve made some incredible leaps, but we have some even bigger leaps coming up in the next century. As we speak, test pilots are flying the YF-22 - the fastest, most maneuverable, and most capable fighter ever designed. In a very few years, this airplane will be produced and deployed to the U.S. Air Force. This airplane isn�t built from metal like previous fighters, but from composites - plastics, resins, and fibers - that not only make it incredibly strong but virtually invisible to radar. |
 |
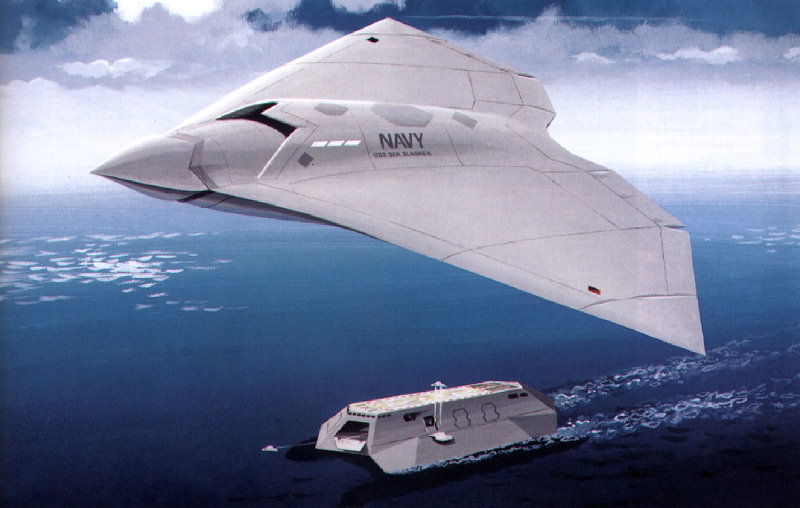
22While the Air Force is testing the YF-22, the Navy is developing the next generation of aircraft carriers and sea-going airplanes. Carriers built in the next century will likely have two runways - one for conventional aircraft like the YF-22 and another for STOL aircraft. "STOL" stands for Short Take-Off and Landing. These jets will become airborne in just a few hundred feet, accelerating down a short runway then springing into the air off a jump ramp at the bow of the carrier. |
 |
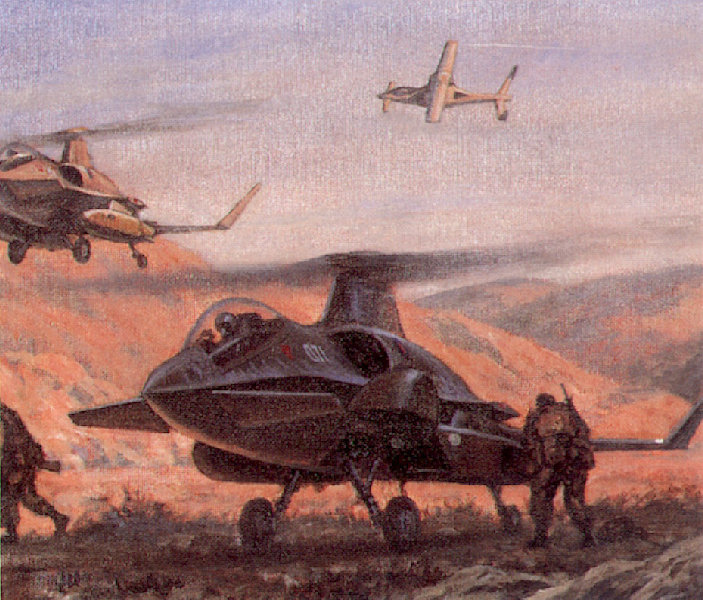
23Helicopters and airplanes may get closer together. The Army is now considering a design for new helicopters that will have a much wider rotor than ordinary helicopters. These rotors will rotate so the aircraft can take off and land vertically. But once in flight they will stop turning and lock in place to serve as a wing. This will make it possible for these helicopters to fly as fast as a jet, something that today�s helicopters just can�t do. |
 |
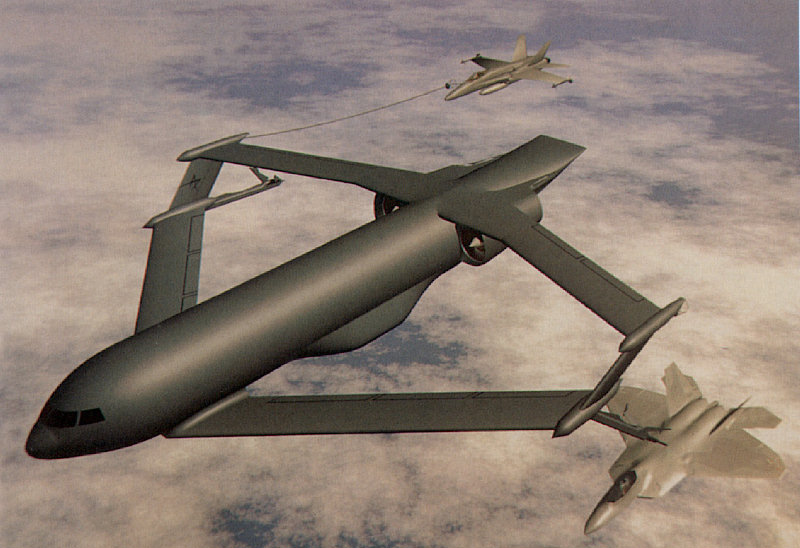
24Aircraft companies are experimenting with new wing configurations that are more efficient and provide much more lift than conventional wings. These new configurations will begin to appear on passenger airplanes and cargo airplanes like this giant tanker. This is actually a biplane (like the Wright Flyer!) with one wing above the fuselage and another wing below it. These new wings may share another characteristic with the Flyer. Instead of relying on movable control surfaces such as ailerons, flaps, and slats, the wings will warp, twist, and change shape. The skin of the wing will be flexible and ribs will be designed so they can move the skin. Eliminating the hinges and seams in the wings needed for conventional control surfaces will make the aircraft much more streamlined. This, in turn, will allow it to fly farther and faster on less fuel. |
 |
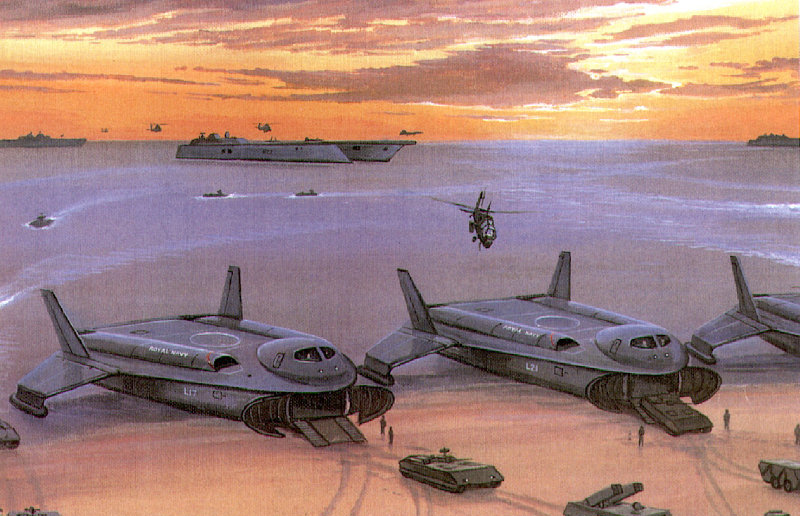
25Some companies are developing a brand new type of airplane known as a "wing in ground effect vehicle." When an airplane flies close to the ground at high speeds, the air balls up under the wings and forms a "cushion" that it floats on. This is called ground effect. These new airplanes will have very short wings that only fly in ground effect. They will never get more than a few feet off the ground, but they will be able to go very fast over both water and desert area - much faster than a conventional hovercraft. These special airplanes will likely be used for landing craft, inspecting pipelines and electric lines, even exploring remote areas of Mars and other planets with an atmosphere. |
 |
26One of the most amazing coming developments in aviation is the UAV - Unmanned Air Vehicle. These airplanes have no pilot on board - they are remote controlled. This means that the pilots who can fly them can perform much more violent maneuvers and send them into more dangerous situations than you could possibly risk with a human being on board. It also means that these airplanes can be any size. Some UAVs are as small as your fist. Future soldiers will likely be issued small UAVs along with their rifles and other personal gear. Under fire, they�ll be able to launch these UAVs to spy on the enemy, jam radar and electronic surveillance, even deliver small bombs, all by remote control. |
 |
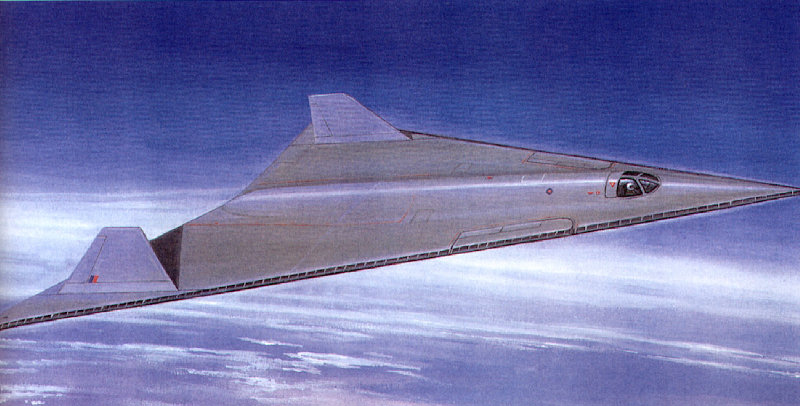
27Some future airplanes may spend much of their time above the atmosphere. Right now, aircraft makers are developing plans for a "skip jet." This remarkable airplane will skip along on top of the atmosphere the same way you skip a stone across the surface of the pond. That�s why the picture shows it big and flat. The advantage of being above the atmosphere most of the time is that there is less drag on the airplane and you can go must faster. The skip jet will probably fly at speeds around Mach 10, or 6000 miles per hour. You will be able to board a skip jet in New York and fly to Tokyo, Japan - halfway around the world - in just over two hours! |
 |
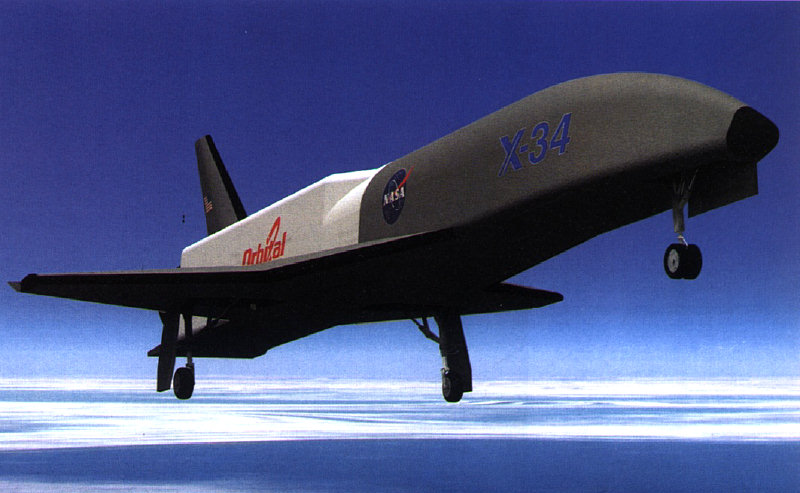
28One of the most exciting airplanes now in development is the X-34, the future replacement for the Space Shuttle. This craft is likely to be the first airplane capable of going into space. Unlike the Space Shuttle, it has no external fuel tank or strap-on rocket boosters. It does not take off vertically from a special pad. Instead, it will be able to take off like a conventional airplane from an ordinary runway, go straight into orbit, 200 miles above the earth. Here, it will be able to dock with Unity, the international space station or any other earth satellite. In your lifetime, you may ride the X-34 or its descendants into space like an ordinary passenger airplane. But all of these future aircraft have something in common with the 1903 Wright Flyer. They all have roll, pitch, and yaw controls. This was - and continues to be - the secret of flight. |
 |
29Once you�ve finished gluing up your practice ribs, we can assemble the full-size rib for the Flyer. You�re going to use a template just like you used for the smaller ribs. But on the larger template, the clamping posts are already in place and you use wedges instead of toothpicks to clamp the cap strips to the spacer blocks. We�ll also use different type of glue - a moisture-proof resin glue called "Titebond 2" donated by the Franklin Glue Company. This is extremely strong - much stronger than the wood, in fact - but it hardens much slower than the wood molding glue. You�ll glue the parts up, but I�ll have to remove them from the template in an hour or so, after you�ve left. Remember that the full-size rib is made in two parts. You�ll need the same number of spacer blocks as you used to make the practice ribs, but you�ll need four cap strips. Also remember that you�re going to sign this rib. They best place to put your signatures are on the top or bottom surfaces of the cap strips. We�re going to divide up the tasks needed to assemble the full-size rib.
And that�s it! The full-size rib will be finished in Dayton when it�s assembled into a wing of the Flyer. |
|
30When you�ve finished assembling the full-size rib, your practice ribs will be ready to come off the templates. Mark the length of the cap strips, then remove the toothpicks - both the posts and the wedges - from the template. Gently lift the rib up. If it seems to stick, pry it up gently with a toothpick. The practice rib won�t hold very tight to the template because it�s covered with the same plastic as the full-size template. If a glue joint pops while you�re removing the rib, don�t sweat it. Apply a little molding glue in the popped joint, clamp it between your fingers for 3 minutes, and the joint will stay together. If you�ve accidentally glued a toothpick to your practice rib, this is also easily fixed. Just separate the toothpick from the rib with a razor blade. Carefully cut the cap strips to the proper length with the hobby saw. Hold the rib down on a piece of scrap wood and gently saw back and forth. Don�t press too hard - the saw works much better when you only apply light pressure. After the glue has hardened overnight, you can sand the rib and apply a finish, if you like. In Dayton, they will be applying spar varnish to the full-size rib to help preserve you names for as long as the airplane lasts - which we hope will be hundreds and hundreds of years. |
|
31Before you go, take a moment to fill out one of these forms for the people who are assembling the airplane at the Wright Brothers Aeroplane Company. They need your name, mailing address, and e-mail address, if you have one. At the bottom of the form is a space for you to make a prediction of what you think the next one hundred years of aviation will bring. For just a minute, think like an inventor. Pretend that you are Wilbur or Orville Wright and you�ve come back to help accomplish the next great thing in aviation. What sort of airplane would you build? What would you design it to do? What improvements would you make to this airplane? Think about what sort of airplane project you�d most like to work on and write it down on the form. Later on, the folks at the Wright Brothers Aeroplane Company will sift through your predictions and assemble them in a big book - the Centennial Book of Aviation Predictions. This book will be displayed with the completed Flyer. The Wright Brothers Aeroplane Company will be sending you several newsletters over the next year to keep you informed on the progress of your Flyer. You can also go to their web site, www.wright-brothers.org, and see how the Flyer is coming along. Sometime before December of 2002, you will be getting an invitation to attend the unveiling of the Flyer at the Dayton International Airport in Dayton Ohio. The unveiling ceremony will be held on December 17, 2002, the 99th anniversary of the Wrights first powered flight. That way, visitors to Dayton will be able to view your Flyer and read your predictions all through the Centennial of Flight in 2003. The Wright Brothers Aeroplane Company has asked me to thank you for taking the time to make this rib and think about the future of aviation. It may seem like a small thing to you now, but the work you did will be displayed for many, many years and inspire millions of people. In the end, this small thing may turn out to be a great thing. |
![]()
![]()
![]()
![]()